
New Player Encyclopedia
Need some answers but no one’s online to show you the ropes? Here you’ll find some basic information about the game to get you started. Just scroll down to find a general topic, and hopefully the info provided will be adequate! All topics will be alphabetical.
As I receive more questions from new players in the game, I will add the most pertinent of them to this page. Think of it as an ever-growing encyclopedia of FAQ!
Resources |
|---|
| Guild Wars 2 Wiki |
| Event Timers |
| Chat Commands |
| Emote Commands |
| Mastery Point List |
| Specializations |
| Pre-Made Builds |
Contents |
|
|---|---|
| Abbreviations & Slang | Map Features |
| Attributes | Masteries |
| Attribute Combinations | Runes & Sigils |
| Builds | Specializations |
| Guilds | What Do I Even Do in GW2? |
Abbreviations and Slang
| anet | “ArenaNet” The company that develops Guild Wars 2. |
| AoE | “Area of Effect” Skills that affect a number of mobs in a target area rather than a single target mob. |
| CC | “Crowd Control” Also known as “control effects” or “disables”. Types of skill effects that prevent actions or movement of an enemy, such as Daze, Knockback, Knockdown, Launch, Pull, Stun, Float, Sink, Fear, and Taunt. These effects will be listed in the descriptions of skills that cause them, so become familiar with what each of your skills does. CC is used to damage an enemy’s breakbar (also known as “defiance bar”). Usually, breakbars are found on champions and other high ranked enemies, and are found just below their health bar when targeted. Enemies with breakbars are immune to CC effects, but using CC on them will slowly deplete the bar. When the bar is totally depleted a special effect will occur that is disadvantageous to the enemy, such as being stunned or taking 50% more damage for five seconds. Use CC when the breakbar is teal to deplete it. There will be no effect if you use CC when it is gray and segmented, which means it is locked. In group battles, players will often shout for everyone to use CC when the enemy’s breakbar turns teal, to deplete it quickly with everyone working together. |
| condi | “Condition Damage” The type of damage opposite of power. Power is about direct hit damage, while condition damage is about slow tick damage over time. Some types of condi include poison, bleeding, and fire. See “Attributes” section below. |
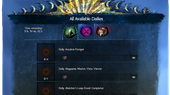
| dailies | Daily Activities Shown in the upper right corner of your screen. There will typically be four daily activities, and completing only three will award you daily completion, which includes 2g per day and other rewards. Dailies reset every 24 hours. Different game modes or areas can have different sets of dailies, but you still only need to complete three across all sets of dailies in order to get your daily completion rewards. For example, you can complete one PvE daily, one PvP daily, and one WvW daily, and still get completion. Some sets of dailies, like those in Lake Doric, are completely separate. Common types of PvE dailies include dungeon runs, JPs, vista viewing, material gathering, boss battles, map events, and activities in Lion’s Arch. Each of these will be semi-specific and tailored to the highest level among all your characters. See “PvE”, “PvP”, and “WvW” in this table. |
| EotM | “Edge of the Mists” An overflow map for WvW. It has its own reward track that doesn’t count toward “real” WvW. It has been relatively empty since a certain update that changed the reward track that many players were unhappy with. |
| GH | “Guild Hall” A central “home”-like instance for your guild. It can be upgraded and decorated. Guild Halls provide services and upgrades for the guild. |
| HoT | “Heart of Thorns” The first of the two current expansions for the game. HoT-exclusive maps include Verdant Brink (VB), Auric Basin (AB), Tangled Depths (TD), and Dragon’s Stand (DS), and collectively are known as the Heart of Maguuma. The other expansion is Path of Fire (PoF). |
| HP | “Hero Point” Found around the world of Tyria, denoted on the map by a greenish-yellow arrow-like symbol. When found, these can take the form of battles or other activities, or they could just be a beacon of white light with which you can “commune” to receive the hero point. Being attacked will interrupt communing. Hero points are used to unlock traits and skills in the Hero panel [H hotkey]. |
| JP | “Jumping Puzzle” A type of activity in the game involving jumping and parkour from one point to another, usually with a prize chest found at the end. These are generally not in the form of separate instances (like home instances or PvP matches), but rather embedded directly into the world of Tyria, albeit usually hidden – meaning you can accidentally stumble across one. All jumping puzzles are listed as achievements in the achievements tab of the Hero panel [H hotkey], and can be looked up online for entrance locations or tutorials. Mesmers sometimes port people to the end and depending on the mechanics of the puzzle, you will usually still get rewarded this way. Certain JPs are often listed as a “Daily” activity. Most mesmers only actively port at the daily JP, since there are so many throughout the game. See “port” in this table. |
| leg | “Legendary” Usually in reference to legendary creatures. Commonly called out in the Silverwastes to alert players in the area to come fight it, since killing one for a first time will grant an achievement. “Legendary” is often used to refer to legendary weapons, but “leg” is rarely used in this context. See “SW” and “RIBA” in this table. |
| LFG | “Looking for Group” A tab in the social panel opened with [Y] hotkey. Parties and squads can be advertised here with a brief description so that anyone may join if they want to participate. LFG is used by groups looking for members for dungeon runs, fractals, meta event participants, roleplaying, advertising JP ports, and anything else under the sun. Once you join a party or squad through LFG, you can right-click on a party member listed in the top-left of your screen for the option to join their instance of the map, if you’re not in the same one already. See “meta” and “taxi” in this table. |
| link | Linking Items or Map Features in Chat You can send a “link” through chat to items/equipment in your inventory or the TP, as well as to WPs and POIs. For items, hovering over the chat link will show details of the item. For map features (WPs and POIs), clicking the link will open the map and show someone where that particular location is, whether they’ve discovered it or not. They can only use the WP, however, if they’ve discovered it. Link items by holding SHIFT or CTRL while left-clicking the item or map feature. SHIFT will add the link to a message-in-progress, so you can type more around it and send it manually. CTRL will simply send the link on its own directly into chat. |
| meta | Meta Event A mapwide event chain that occurs on a timer, usually cycling every couple to few hours. Central Tyria metas tend to be relatively ignorable. HoT metas tend to shut down features of the map while in progress, such as access to certain vendors or activities, making them difficult or impossible to ignore. Metas require large-scale cooperation between players and often reveal access to new areas of the map and/or valuable loot when successful. |
| MP | “Mastery Point” Similar to HPs, except exclusive to the paid expansions (HoT and PoF). Denoted on the map by a sun-like circle with three long, equidistant “rays” (color depends on map area). MPs currently come in three types and are exclusive to different areas: HoT maps, PoF maps, and base game Central Tyria maps. HoT MPs are green and PoF MPs are magenta. Central Tyria MPs exist and are red, but they are only accessible once you’ve unlocked the mastery system, which requires buying an expansion. MPs on the map will take the form of beacons of white light with which you can “commune”. Like HPs, being attacked will interrupt communing. Many MPs are hidden in the form of beating certain bosses for a first time, or other “secret” activities such as flying under all three arches in Auric Basin’s Forgotten City (inside the east gate) – these “hidden” MPs do not show up on the map but can be found in guides and tutorials online. MPs are used in combination with mastery levels (gained by obtaining EXP after level 80) to unlock mastery skills and abilities, such as gliding (HoT), mushroom bouncing (HoT), access to special vendors (HoT & Tyria), and mount training (PoF), via the Mastery Training tab of the Hero panel [H hotkey]. See “Map Features” and “Masteries” sections below. |
| PoF | “Path of Fire” The second of the two current expansions for the game. PoF-exclusive maps include Crystal Oasis, Desert Highlands, Elon Riverlands, The Desolation, and Domain of Vabbi, and collectively are known as the Crystal Desert. The other expansion is Heart of Thorns (HoT). |
| POI | “Point of Interest” A feature on the map, just like waypoints, hero points, and vistas. Denoted by an orange square bordered by white, but grey when undiscovered. POIs are useful for linking in chat to indicate other players where to go. They must be manually discovered before they can be linked. See “Map Features” section below. |
| port | “Portal” Used in reference to characters of the mesmer class creating portals for other players to travel through. Most often these are used to transport players from the beginning to the end of a jumping puzzle, as an act of kindness (but sometimes for tips – usually from 25s to 1g – although most mesmers won’t ask for tips, and some even reject them). Ports are also used in battle, such as in PvP or WvW. See “JP”, “PvP”, and “WvW” in this table. |
| PvE | “Player vs. Environment” The aspect of the game that involves open-world maps and story progression. This includes renown hearts, events, meta events, map completion, jumping puzzles, etc. See “meta” and “JP” in this table, and “Map Features” section below. |
| PvP | “Player vs. Player” An aspect of the game that involves entering matches against other players, and has a reward track. Two teams of five are pitted against each other in an arena where three rally points exist to be captured and maintained for points throughout the timed match. Standing inside the point’s glowing circle will claim it for your team, and players battle to gain control of the area. The unranked arena is open year-round. In the seasonal ranked arena, players battle for particular ranks, prizes, and collections. Custom arenas also exist. |
| r | “Ready” Commonly used to ask if members of a group are ready to begin an event or activity, and to reply that you are in fact ready. |
| rep | “Represent” Ticking the box next to a particular guild you belong to in the Guild panel [G hotkey], thus adding the guild’s tag (ex. [KIND]) beside your character’s name in the game. You can only rep one guild at a time, or none. Repping is important to some guild leaders for social representation, and is necessary for your contribution to guild activities to be counted toward that particular guild. [KIND] does not have a rep requirement except during such activities (simply because they won’t count otherwise), although we are always proud to have our name out there if you do choose! See “Guilds” section below. |
| RIBA | “Red, Indigo, Blue, Amber” The usual order of cycling through fortresses when farming in the Silverwastes. There are four: Red Rock Bastion, Indigo Cave, Blue Oasis, and Amber Sandfall. “RIBA farming” involves a large group of people circling the map, starting at retaking Red, then moving to Indigo, and so on, and then spreading out to keep control of each fortress. The reason for the cycling is to get credit for more defense events in a shorter period of time, resulting in more loot, since all you need for credit is to kill a few mobs and move on even if the event isn’t yet over. You will receive the rewards when people lagging behind you finish it. The reason for the particular RIBA order is to keep the timing of assaults on each fortress in this order, so the “zerg” (main group) can keep up with them by circling and no fortresses will be lost while the zerg’s attention is on another. See “SW”, “meta”, and “leg” in this table. |
| spec | “Specialization” Often referencing an elite specialization, but can refer to any regular spec. A unique subset of each class, granting access to exclusive traits and skills. Traits and skills within the specialization are trained with hero points. Must be active in the Build tab of the Hero panel [H hotkey] to reap the benefits of chosen traits. Elite specs are available at level 80 and allow access to an additional weapon type. For example, Chronomancers (a mesmer elite spec) can wield shields while regular mesmers cannot. PoF introduced an extra elite spec for each class, so now two options exist if you have both expansions. See “Specializations” section below. |
| SW | “Silverwastes” One of the two maps in the Maguuma Wastes (the other being Dry Top). Its meta event is commonly “farmed” by players for loot to salvage and sell. See “RIBA” and “meta” in this table. |
| taxi | Bringing Players Into a Map Instance A “taxi” is a party created to be advertised in LFG so that players can join, switch to the same instance of the map, leave the party, and then participate in the same version of an event as “everyone else”. Useful to consolidate people into a single instance for meta events, where many players are necessary to make it successful. See “meta” in this table, and see “LFG” in this table for how to switch instances. |
| teq | “Tequatl the Sunless” The world boss of Sparkfly Fen, a large dragon. |
| TP | “Trading Post” The panel where players can trade with each other for gold, opened with [O] hotkey. This hotkey also opens the gem store and gold/gem conversion page, under different tabs. Listing an item in the TP costs a small fee and there is usually a minimum price set for particular items. Account-bound and soulbound items can’t be bought or sold here. All transactions are anonymous and automatic. Transactions may be made anytime and anywhere, but gold and items can only be picked up at a physical Black Lion Trading Company location. These exist in all major cities, or a delivery agent can be summoned to your location via a certain item obtained from the gem store or by chance from a Black Lion chest. |
| WP | “Waypoint” Teleportation points found throughout all of Tyria. Denoted on the map by a blue diamond bordered by silver. The vast majority of them only become usable once you’ve manually discovered them “in person” for a first time. You can pay a small fee to teleport to any of them (that you’ve previously discovered) at any time that you’re not in combat. Use them by clicking directly on the blue diamonds on your map or minimap. The farther away the WP, the higher the fee to use it. These differ from asura gates because you must be physically present at a gate to use it, and gates travel only between two set destinations. See “Map Features” section below. |
| WvW | “World vs. World” An aspect of the game that involves the capture of objectives and resources in special maps, and has a reward track. It is, in effect, a unique combination of PvP and PvE. These maps accommodate many players and reset weekly. There are three large teams, and your team depends on which “server” or “home world” you chose when creating your account. Several servers are lumped into a team and are rotated weekly – meaning, your team will change. The teams are Blue (Frostreach, “FR”), Green (Overgrowth, “OG”), and Red (Badlands, “BL”).See “PvE” and “PvP” in this table. |
| Location Abbreviations | |||
|---|---|---|---|
| AB | Auric Basin (HoT) | LA | Lion’s Arch (city) |
| BL | Badlands Region (WvW) | OG | Overgrowth Region (WvW) |
| DR | Divinity’s Reach (city) | SC | Southsun Cove |
| DS | Dragon’s Stand (HoT) | SW | Silverwastes |
| DT | Dry Top | TD | Tangled Depths (HoT) |
| FR | Frostreach Region (WvW) | VB | Verdant Brink (HoT) |
| Class Abbreviations | |
|---|---|
| Elementalist | ele |
| Engineer | eng, engi |
| Guardian | [no common slang] |
| Mesmer | mes |
| Necromancer | nec, necro |
| Ranger | [no common slang] |
| Revenant (requires HoT) | rev |
| Thief | teef |
| Warrior | [no common slang] |
Attributes
https://wiki.guildwars2.com/wiki/Attribute
| Power | Increases direct damage |
| Condition Damage | Increases condition damage (such as poison, bleeding, or fire) |
| Precision | Increases critical hit chance |
| Ferocity | Increases critical hit damage |
| Toughness | Increases defense ability |
| Vitality | Increases maximum health |
| Healing Power | Increases healing ability from all sources (i.e. traits, skills, or other effects) |
| Concentration | Increases boon duration |
| Expertise | Increases condition duration |
Attribute Combinations
https://wiki.guildwars2.com/wiki/Attribute_combinations
Q: What are attribute combinations?
A: They’re the particular stat combos you see on weapons and armor. For example, wielding a Berserker sword will boost your power, precision, and ferocity. See “Attributes” section above.
Q: What do “major” and “minor” attribute mean?
A: The major attribute(s) of a combo is the one (or two) with the highest boost. Three-stat combos have one major attribute. Four-stat combos have two major attributes. For example, an Assassin helmet might provide you +53 precision as the major attribute, but only +38 power and +38 ferocity as the minor attributes. Similarly, Wanderer boots might provide +38 power and +38 vitality as the major attributes, but only +21 toughness and +21 concentration as the minor attributes. Attribute stats increase as the equipment level/quality increases.
Q: How can I get four-stat equipment?
A: These usually have to be crafted or otherwise earned. Four-stat combos are certainly rarer. Guides for acquisition can be found online.
Q: Can I boost the attribute stats of my equipment?
A: Absolutely! Using runes for armor and sigils for weapons, you can increase certain attributes. Runes and sigils can be acquired through vendors, the TP, completing dungeons, and other loot. More information can be found online. See the “Runes & Sigils” section below.
* Underlined attribute(s) is/are the major attribute(s) of that set *
| Three Stat Combos | |
|---|---|
| Berserker | Power, Precision, Ferocity |
| Soldier | Power, Toughness, Vitality |
| Valkyrie | Power, Vitality, Ferocity |
| Rampager | Precision, Power, Condition Damage |
| Assassin | Precision, Power, Ferocity |
| Knight | Toughness, Power, Precision |
| Cavalier | Toughness, Power, Ferocity |
| Nomad | Toughness, Vitality, Healing Power |
| Settler | Toughness, Condition Damage, Healing Power |
| Sentinel | Vitality, Power, Toughness |
| Shaman | Vitality, Condition Damage, Healing Power |
| Sinister | Condition Damage, Power, Precision |
| Carrion | Condition Damage, Power, Vitality |
| Rabid | Condition Damage, Precision, Toughness |
| Dire | Condition Damage, Toughness, Vitality |
| Cleric | Healing Power, Power, Toughness |
| Magi | Healing Power, Precision, Vitality |
| Apothecary | Healing Power, Toughness, Condition Damage |
| Harrier (requires PoF) | Power, Healing Power, Concentration |
| Four Stat Combos | |
|---|---|
| Celestial (no major attribute/s) | Power, Precision, Toughness, Vitality, Condition Damage, Ferocity, Healing Power (jack of all trades, but master in none) |
| Commander | Power, Precision, Toughness, Concentration |
| Marauder | Power, Precision, Vitality, Ferocity |
| Vigilant | Power, Toughness, Concentration, Expertise |
| Crusader | Power, Toughness, Ferocity, Healing Power |
| Wanderer | Power, Vitality, Toughness, Concentration |
| Viper | Power, Condition Damage, Precision, Expertise |
| Seraph | Precision, Condition Damage, Concentration, Healing Power |
| Trailblazer | Toughness, Condition Damage, Vitality, Expertise |
| Minstrel | Toughness, Healing Power, Vitality, Concentration |
| Grieving (requires PoF) | Power, Condition Damage, Precision, Ferocity |
| Marshal (requires PoF) | Power, Healing Power, Precision, Condition Damage |
Builds
https://metabattle.com/wiki/MetaBattle_Wiki
Q: What is a build?
A: A build is the combination of your character’s specializations, traits, utility & elite skills, weapons, equipment attributes, runes & sigils, and, I might add, your play style. I mention play style because you won’t get anything out of a build if you don’t use it effectively. The great thing about builds in GW2 is that you don’t have to make permanent decisions as you level your character; once you’re level 80, you can mix and match specs and skills and equipment to your heart’s content to create different builds.
Q: How do I find an effective build?
A: You can play around with it yourself, or you can pick up a pre-made build from a site like MetaBattle or quanTify. If you’re looking for a build for PvP, WvW, fractals, or raids, I suggest picking up a tried and true build until you are practiced in the art of build-making and know exactly what is conducive to your play style. As for myself, I mainly play in PvE, where almost any build can be made to work, so I tend to mess with it myself. My personal routine is to snag a build from MetaBattle and then tweak it to my play style, accounting for skills and actions I tend to use more or less than the pre-made build requires. But you may take a pre-made build exactly as it is, or start completely from scratch. It’s up to you!
Q: I’m starting from scratch or tweaking an existing build. Any tips?
A: Make sure everything works together. Use runes & sigils that buff certain traits you’ve chosen, and vice versa. Use runes & sigils that buff and work off each other. Choose an attribute combination that reflects your needs, such as Power if you rely on direct damage and critical hits, or Condition Damage if you rely on a lot of condi effects, or Toughness & Vitality if you are geared toward support and/or want to be a tank. When choosing specializations, choose specs and traits that are relevant to each other and how you play. Always consider your play style. For example, if you’re a mesmer who finds yourself never using your shatters, and are unable to train yourself to use shatters, perhaps don’t go the Chronomancer route nor choose traits that buff shatters. However, absolutely do use these traits, as well as ones that buff and increase number of illusions, if you find yourself shattering a lot or can train yourself to do so. Another example: don’t pick traits that decrease fall damage or activate an effect upon dodge rolling if you never find yourself falling or dodge rolling. On the flip side, if such traits can prove valuable, you can make a conscious effort to dodge roll more often to utilize the benefits, etc. Another example: If you’re a ranger that swaps pets a lot, pick traits that activate effects upon swapping pets, and then pick runes & sigils that buff those effects. Choose weapons with skills that are conducive to your build. For example, I have a power/condi mes who uses twin swords for power attacks and a staff for the condi aspect, since the mesmer staff is primarily based in condi. Another popular choice for power mesmers is a greatsword, which is primarily based in power. Pick utility & elite skills that will be improved by your traits and attributes, as well as play style. For example, a condi ranger might utilize Traps that cause condi damage and disables. An elementalist might choose to use more Glyphs if they have a particular trait that buffs Glyph skills. A mesmer who likes to evade and utilize mobility might use Blink to quickly teleport away from an enemy. See the last Question in both the “Runes & Sigils” section and “Specializations” section below.
Q: Can you give me an example of a particular build that is designed to build off itself?
A: I’ll give you my mesmer build. I will include descriptions of skills and traits so you can understand exactly what is going on. Keep in mind that these work for me personally, as play style is a huge part of how effective a particular build will be. Also keep in mind that: I’m not an expert in build-making so it isn’t the most objectively effective build; power/condi builds can be difficult to balance; and, this build is primarily used in PvE, where pretty much anything goes.
Mesmer (power/condi-based, leaning toward condi) |
|---|
ArmorRampager Stats (Precision, Power, Condi) |
WeaponsDual Swords: Staff: |
Weapon SkillsDual Swords: Focus on direct damage, evasion, inflicting vulnerability, and summoning illusions |
Specs & TraitsIllusions: Inspiration: Chronomancer: |
Heal SkillWell of Eternity |
Utility SkillsMirror Images (summon 2 clones) |
Elite SkillSignet of Humility |
SummaryThis build is completely centered around summoning illusions then shattering them, and improving said illusions and shatters. I’ve chosen traits that add conditions and other effects to shatter skills (thus making them more powerful), and a stat combo & rune that will increase that condition damage. The Rampager stat combo also gives me power for increased damage with my swords, which have sigils that add bleeding-related effects on top of the direct damage. The staff also has sigils that give bleeding-related effects when I switch to it. Because the staff has no power skills, I’ve given it Dire stats instead, to increase my condition damage even more when using the staff. The Dire stats also give me toughness and vitality, which helps me stay alive longer while I’m depending on slow-tick damage or fleeing. My Rampager stat combo gives me lots of precision, which increases my critical chance and in turn, the chance that my sword sigils will cause bleeding. My rune is also geared toward bleeding-related effects. Many of my traits, as well as my first utility skill, increase the number of clones I can create and therefore shatter. My second utility skill gives me increased condition duration and can help me avoid being hit when used. My third utility skill is purely for mobility, to avoid attacks or flee the area if needed. I used Signet of Illusions (passive: more health to illusions; active: recharge shatter skills) instead of Signet of Midnight for a while, until I decided that A) my illusions were never around long enough for health to matter, and B) although I shatter a lot, I don’t shatter enough to not be able to wait two seconds for a shatter skill to finish recharging. This was a personal choice. |
Play StyleThis build is heavily dependent on summoning illusions, shattering, weapon swapping, and mobility (i.e. avoiding damage). I generally enter combat using Sword 3, which has a clone leap at my foe and attack before I even get there. I can then swap places with the clone and immobilize the foe. As soon as I’m in front of the foe I use Sword 2, which is a flurry of attacks while evading all attacks directed at myself. I use Sword 5 whenever it is charged to deal damage and summon an illusion, and I use Sword 4 when nothing else is charged to either summon an illusion when struck, or proceed with stunning the enemies in front of me. When everything else is in cooldown, I use the Sword 1 chain. Whenever I have at least 2 illusions present and a shatter skill charged, I shatter. Whenever I only have one illusion present and Mirror Images is charged, I use it then shatter. I use Signet of Midnight whenever it is charged. After executing all Sword skills for the first round, I swap to my staff and immediately use Staff 2, which teleports me backward and leaves a clone in my place. I then cast Staff 4 on myself which is a shield that gives foes conditions and myself boons when I’m struck. I then summon a clone with Staff 3 and cast a storm that applies conditions on foes and boons on allies with Staff 5. I then continue to attack with Staff 1, which applies conditions to foes and boons to allies on hit, until my weapon swap is recharged, then I swap back to swords and repeat the cycle. While I’m using my staff, I have increased toughness and vitality, and I continue to use Staff 2 as well as Blink to continuously avoid damage until I swap back to melee. While using staff, I continue the cycle of shattering illusions to maximize damage. This build requires a lot of mental coordination to keep track of the attack patterns while simultaneously keeping track of which summoning/shattering skills are charged to use as soon as possible, as well as accounting for regular improvisation due to unforseen circumstances. I often swap to my staff for the purpose of fleeing if I’m very low on health, due to the Staff 2 skill and my staff’s increased toughness and vitality. When I flee, I leave my illusions unshattered so they can distract the enemy as I leave. This is the play style that I have found works for me and my brain/reflexes. I personally work well with patterns. It is possible to use the same build in a different way, or without such focus on using an attack pattern like I do. |
FlawsI do not use Continuum Rift/Continuum Shift. I have yet to understand it so I simply haven’t incorporated it into my attack pattern, although I know it would probably benefit me. I also have not yet gotten around to utilizing trinkets, although they would boost my stats. If I did introduce trinkets to my build, I would center them around Rampager’s stats like the rest of my armor. I find I don’t use my elite skill enough, which would further utilize condi damage, especially bleeding. My particular play style might be disadvantageous in a PvP setting, where my attack pattern could become predictable. |
Guilds
https://wiki.guildwars2.com/wiki/Guild
Q: How many guilds can I be in?
A: You can be in 5 guilds at once, but can only represent one at a time. Each character can represent a different guild, or you can represent the same guild or no guild at any time.
Q: How do I create my own guild?
A: Press the [G] hotkey and click on “Create Guild”. Choose guild name and tag. The tag will be the 3-4 letter word or acronym that appears next to the names of members who represent the guild. Creating a guild costs 1g.
Q: Do you have tips for running a guild?
A: Well, only a few, since I’m new at it myself. Try to be present. Absent guild leaders make for inactive guilds. Be fair and impartial when dealing with members, even if you’re friends with some. Giving preference for some members isn’t fair and will drive people away. Lay out the rules and expectations clearly and decisively. Deal with issues promptly and maturely. Recruit actively by inviting people with whom you’ve been playing the game, rather than inviting any random soul you pass. Indiscriminate recruiting leads to large, disorganized, mish-mashed guilds with members frequently coming and going. But if that’s what you want, go for it. Offer activities for guild members to keep them interested. Buy guild upgrades and claim a hall to attract and keep new members. Starting with a core group helps, these can be cooperative friends. Promote members’ ranks as they deserve it. Be active on your guild chat and make a conscious effort to make everyone feel welcome and included. Expect running a successful guild to be an investment, and expect to have to attend to members and issues when you’d rather be playing alone sometimes.
Q: What do I get out of being in a guild?
A: It depends on what the guild was established for and what you’re looking to get out of it. Larger, stronger guilds will likely have guild halls that offer many resources for members, and buffs that its members can take advantage of while playing the game. Some guilds will have good camaraderie where you can make great friends and get help with the game, and others will feel cold and antisocial. Certain guilds are oriented toward a particular play style, such as PvE, PvP, or WvW. Different guilds will host different activities. Some guilds exist for the sole purpose of running successful daily or weekly meta events (such as Tequatl or RIBA farming), or to conglomerate mesmers who like to port at daily JPs, or roleplaying, or any number of other activities. Look into what your guild is all about and then decide if it offers what you want from it!
Q: How can I be involved in [KIND] and help it grow?
A: Simply being online and present is the best way to be involved! Repping is not required, but is definitely encouraged. Make sure to spread kindness and aid to those who need it, whether the recipient is part of the guild or not. Invite any player you’ve met personally and think would be a good fit for us. Chatting on our guild chat every once in a while is highly encouraged, even if it’s just checking in, to help build bonds between members and to let each other know that we are present and active in the game. Responding to queries about guild missions or upgrades will help the guild to be more organized and democratic. Planning and showing up for guild missions will benefit us all, and hopefully attract new members in the future. You’re still welcome if you don’t participate, but it is highly encouraged! Asking questions and utilizing our aid is always encouraged, and so is answering questions and aiding those who need it. That’s what [KIND] is all about, after all. At the end of the day, just be a good and helpful person and let us know you’re still around once in a while, and you’ll fit [KIND] just fine.
Map Features
https://wiki.guildwars2.com/wiki/Map
|
|
|
|
|
|


|
|
|
|


Notes: Only communable Central Tyria Mastery Points are found on the map. Others can be acquired through “hidden” challenges, which can be found in online guides and tutorials. Mastery points are used in combination with mastery levels to unlock area-specific mastery skills. Gliding and mount training skills are the exceptions, which can be utilized anywhere.
Masteries
Q: What is the mastery system and how do I unlock it?
A: You must have one of the two game expansions and have a character at level 80 to unlock the mastery system. Since 80 is the maximum level, it’s basically a system of end-game leveling, but reserved for those who’ve bought the game. Participating in the game earns you mastery experience just as it always has, but now you can spend mastery levels in combination with mastery points to unlock new game abilities such as gliding, legendary weapon crafting, and access to special merchants.
Q: How do I earn mastery levels and points?
A: Earn mastery levels by playing the game. Mastery experience can only be earned on a level 80 character, but progress is shared across all characters on your account. Likewise, your gold-colored mastery level is only shown beside the name of your level 80 characters. Earn mastery points by communing with them on the map (mastery symbols shown in the “Map Features” section — they all appear silver on the map before you find & commune with them) or earning them by completing “hidden” challenges such as certain boss battles. More obscure ones exist as well, such as opening certain chests hidden in HoT maps or flying under all three arches of Auric Basin’s Forgotten City. Guides can be found online for how to get these kinds of “hidden” points. Once you’ve earned a specific mastery point on one character, you’ve earned it for your whole account and cannot earn it again.
Q: Why are mastery points different colors/broken into sections?
A: Different mastery points exist for each part of the game: the base game (Central Tyria), Heart of Thorns, and Path of Fire. Central Tyria mastery points can only be acquired in Central Tyria maps, and so on with HoT and PoF. Although Central Tyria isn’t part of an expansion, you still must own an expansion to unlock the mastery system in the first place. Accordingly, there are three sections of mastery abilities under the Hero panel [H kotkey] that each correspond with these three parts of the game. A HoT ability can only be unlocked with HoT points, but will use up a level of experience no matter where the experience was earned. Once unlocked, most abilities can only be used in the maps with which they correspond. For example, bouncing mushrooms and Nuhoch vendors only exist in HoT maps. However, some skills are independent of map features (like gliding and mount training) and can be used anywhere.
Q: How do I start training a particular mastery ability?
A: Open the mastery tab of the Hero panel [H hotkey] and click on an ability track on the left. These will be something like “Gliding” or “Itzel Lore” and will open a list of several specific abilities, which you must train in order. Click on the currently available one that you want to train and just play the game in that area. An ability must be selected to actively train or else your mastery experience will be wasted. You can have three abilities selected to actively train at a time: one for HoT, one for Central Tyria, and one for PoF. However, the only one that will actually be trained is the one that corresponds with the area you’re actively playing in. For example, you can have a HoT “Gliding” ability, a Central Tyria “Pact Commander” ability, and a PoF “Raptor Mount” ability all selected to train, but if you are only earning experience in HoT maps, only the “Gliding” ability will be trained. Likewise, if you move to Central Tyria and start earning experience there, the “Pact Commander” ability will be trained instead. Once an ability is fully trained, you may advance a mastery level and expend a certain number of mastery points to learn the ability. All learned abilities are usable by all your characters, regardless of their individual level.
Runes & Sigils
Q: What is a rune?
A: A rune is something you can insert into your armor pieces to gain certain effects. Certain runes might increase your condition damage, vitality, poison duration, or any number of other effects. The way runes work is that there is a list of effects in their description. If you have one piece of armor with that particular rune, only the first effect will be active. If you have two pieces of armor with that particular rune, the first two effects will be active, and so on, in order. Ideally, you should have the same rune in each of your six types of equipment (helm, shoulders, chest, gloves, pants, shoes) to reap the full benefits of that rune, since the effects tend to get more powerful down the list. You can only insert one rune per piece of equipment. In your finished equipment set, make sure you have all Superior runes. Superior is the highest tier and will give you the greatest boosts.
Q: What is a sigil?
A: A sigil is something you can insert into your weapons to gain certain effects. Certain sigils might increase critical chance or bleeding duration, activate a condition upon landing a critical hit, or any number of other effects. Sigils do not stack their effects with others of the same type like runes do. For example, if you have two Superior Sigils of Venom in a weapon, the 20% poison duration increase this sigil grants will not double to 40%. A more worthwhile sigil for the second slot might be a Sigil of Doom, which inflicts poison upon your first attack after swapping weapons, or a Sigil of Blight, which gives a 60% chance to inflict an area poison attack when you land a critical hit. You can insert two sigils into a two-handed weapon, like a staff or greatsword. You can insert one sigil per one-handed weapon, like a dagger or pistol, so you will still end up with a total of two sigils when wielding both weapons. In your finished weapon set, make sure you have all Superior sigils. Superior is the highest tier and will give you the greatest boosts.
Q: How do I get runes & sigils?
A: You’ve probably already gotten your hands on some. They’re often dropped as loot, found in chests, and received as event, quest, or leveling rewards. They’re also found in dungeons. Most of these are lower tier runes/sigils. To get Superior runes/sigils, or a specific rune/sigil, your best bet is to just buy it off the TP. Most runes/sigils are relatively inexpensive, although a few rare or highly-sought-after ones will cost several or more gold.
Q: How do I insert a rune or sigil? Can I swap runes/sigils that are already in my equipment for new ones?
A: Simply double click the rune or sigil in your inventory (or Equipment section of your Wardrobe, found in the Hero panel [H hotkey]), then click on the piece of equipment you wish to insert it into. A window will appear that will allow you to choose which slot to insert the rune/sigil into. If there is already a rune/sigil in the equipment, you may “overwrite” the old rune/sigil with the new one, but the old one will be lost.
Q: Can I recover old runes/sigils that are already in equipment?
A: The only way to recover old runes/sigils is to salvage the equipment, leading to loss of that equipment. You must decide which is more valuable: the equipment or the old rune/sigil. Most salvage kits only have a chance to recover upgrades (runes/sigils), and this chance percentage can be found in the description of the salvage kit. If you want a 100% chance of recovering the desired rune/sigil, you must use a Black Lion salvage kit. These can be acquired through the gem store or obtained randomly from opening Black Lion chests. Black lion chests are occasionally dropped by mobs and can be bought from the Trading Post, and keys can be purchased from the gem store or acquired as random rewards for some activities like completing personal story or map completion. Because of the difficulty of acquiring Black Lion salvage kits, I personally save them for solely the reason of recovering upgrades.
Q: What about gemstones & jewels?
A: Gemstones & jewels work similarly to runes and sigils. Jewels are gemstones that have been upgraded by Jeweler crafting. Gemstones can also be used to craft trinkets, which include jewelry and certain other items. Gemstones can be placed into any equipment, while jewels can only be placed into trinkets. Gemstones & jewels will use an upgrade slot just like runes/sigils do. Gemstones & jewels provide direct attribute bonuses, like +Power or +Toughness, or a combination of attributes. Jewels provide greater bonuses than gemstones, and higher tier jewels provide greater bonuses than lower tier jewels. The greatest tier of jewel you can craft is dependent on your Jeweler level.
Q: How do I make the most of my runes/sigils to create a strong build?
A: Make them work together and build off each other. If you swap weapons a lot, consider sigils that trigger effects when swapping weapons. If you have traits in your specializations centering around a particular type of condi damage, like bleeding or poison, choose runes & sigils that focus on buffing that condi damage or provide more of it. If you have a lot of traits that depend on landing critical hits, choose runes that increase Precision and Ferocity, and sigils that increase critical chance, such as the Sigil of Intelligence, which causes your next three attacks after swapping weapons to guaranteed critical hit. Avoid using random runes/sigils that just seem cool at the time, such as using a sigil that triggers an effect upon landing a critical hit if you have very low critical chance, or using a rune that buffs your condi if your build relies on power. Avoid using a mish-mash of different runes, because this will result in only getting the lowest benefit of each rune. Utilize trinkets and jewels to boost your basic attributes. You can look online or scroll through options on the TP to get a feel for what kinds of runes/sigils exist and which ones you might want. See the last Question of the “Specializations” section below. Also see the “Builds” section above.
Specializations
https://wiki.guildwars2.com/wiki/Specialization
Q: What is a specialization?
A: A specialization is basically a group of traits and skills unique to your class that you can train by expending hero points, and activate in the Build tab of the Hero panel [H hotkey]. Train specs under the Training tab of the Hero panel. Five core specs exist for each class, plus one elite spec per class per expansion. You can only have three total specs active at a time, but can change them whenever. Each specialization slot is unlocked at levels 21, 45, and 71, respectively. When all traits in a spec have been trained, you will be automatically granted the three minor traits and may choose one from each of three sets of 9 total major traits. Looking at a specialization slot, this will make more sense. Traits will grant you different advantages, such as a mesmer creating a clone every time he dodge rolls, or a thief gaining vigor when using a healing skill. Unlike the mastery system (which is account-wide), specializations are character-specific.
Q: What is an elite spec?
A: You must have one of the two game expansions and have a character at level 80 to unlock elite specializations. Additionally, all core specs must be fully trained before you can begin training an elite spec. An elite specialization is just like a regular specialization, except it provides access to a new healing skill, elite skill, set of utility skills, and a new type of weapon you can use (for example, a Druid [ranger elite spec] can use a staff, while a regular ranger cannot). Each expansion gives access to one of two currently existing elite specs per class. If you have both expansions, you have access to both elite specs for each class, provided that you train it with hero points (just like a regular spec). Elite specs can only be equipped in the third specialization slot, and must be active in order to have access to all the things it provides.
Q: How can I make the most of specializations to create a strong build?
A: Choose specs and traits that work not only together, but also with your equipment, utility skills, and style of play. For example, you might choose a spec and traits that focus on critical chance, and another that focuses on poison damage, perhaps including a trait that inflicts poison damage when you critical hit. In this way, these two specs will work together. Furthermore, if you maximize critical chance and poison damage in your traits, you can insert runes and sigils into your equipment that increase poison damage and duration, increase critical damage, and/or activate effects (preferably poison effects) upon landing a critical hit. (This entire example has been hypothetical). If you have a Chronomancer build (mesmer elite spec), you might focus your traits on illusions and shatter skills, select utility skills affecting illusions and shatters, and get yourself used to utilizing your shatter skills in order to make the most of your build (the latter being where style of play comes in). Builds work differently in different game modes like PvE, PvP, and WvW, and even between features like fractals and raids. You can typically make almost any build work in PvE, but creating an effective build is more important than ever in game modes like PvP and WvW. Pre-made builds geared toward different game modes (usually PvP, WvW, fractals, and raids) can be found online for each class. Many involve using an elite spec, and most should provide instructions for how to play the build effectively. See the last Question in the “Runes & Sigils” section above. Also see the “Builds” section above.
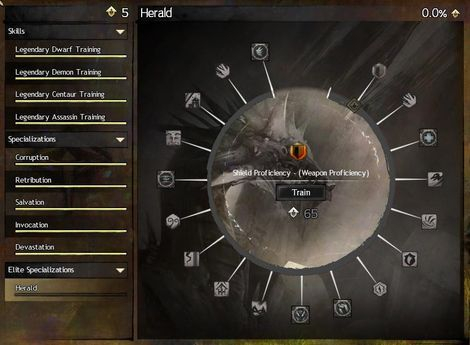 Training Tab with Untrained Elite Specialization |
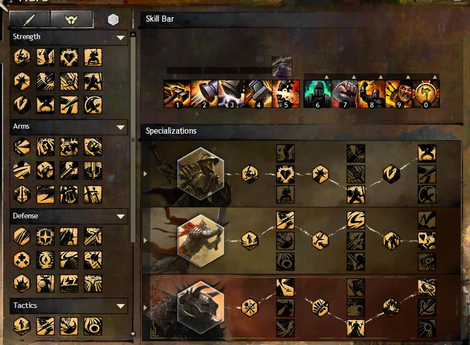 Specialization Slots with All Traits Chosen |
What Do I Even Do in Guild Wars 2?
|

|
|
|
|
|
|
|
|
|
|
|
|
|
|
|
|
|
|
|
|
|
|
|
|